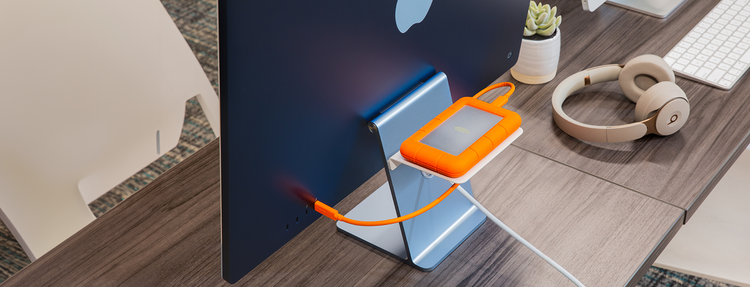
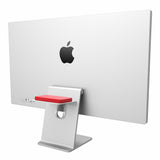
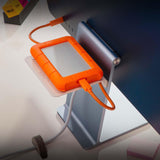
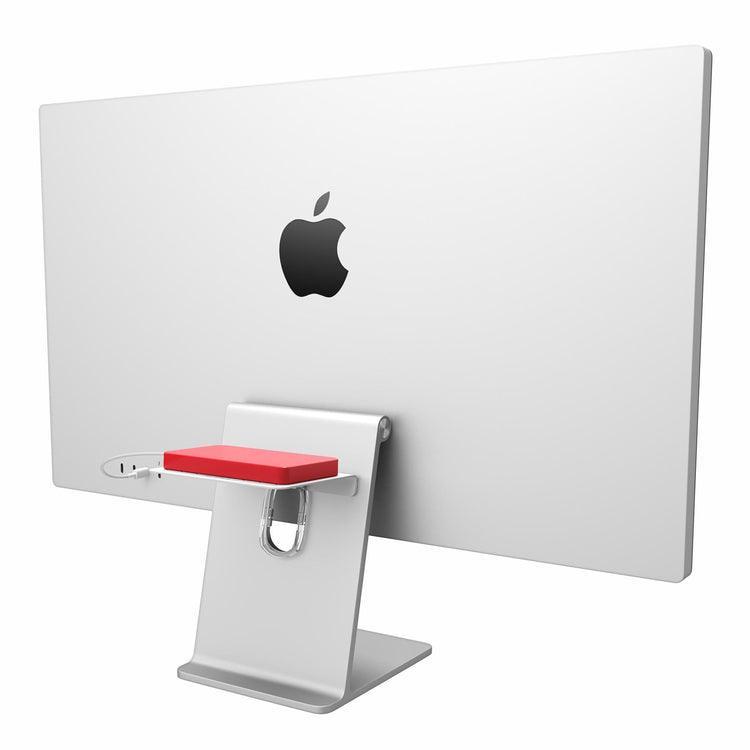
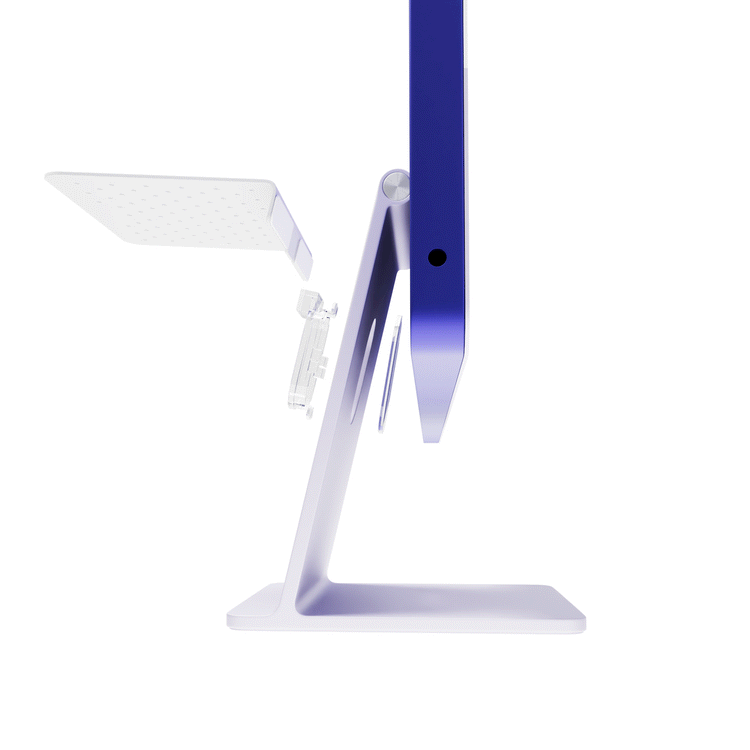
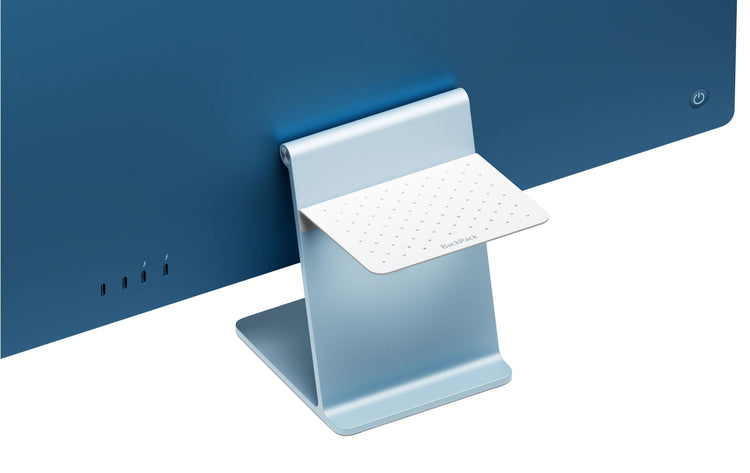
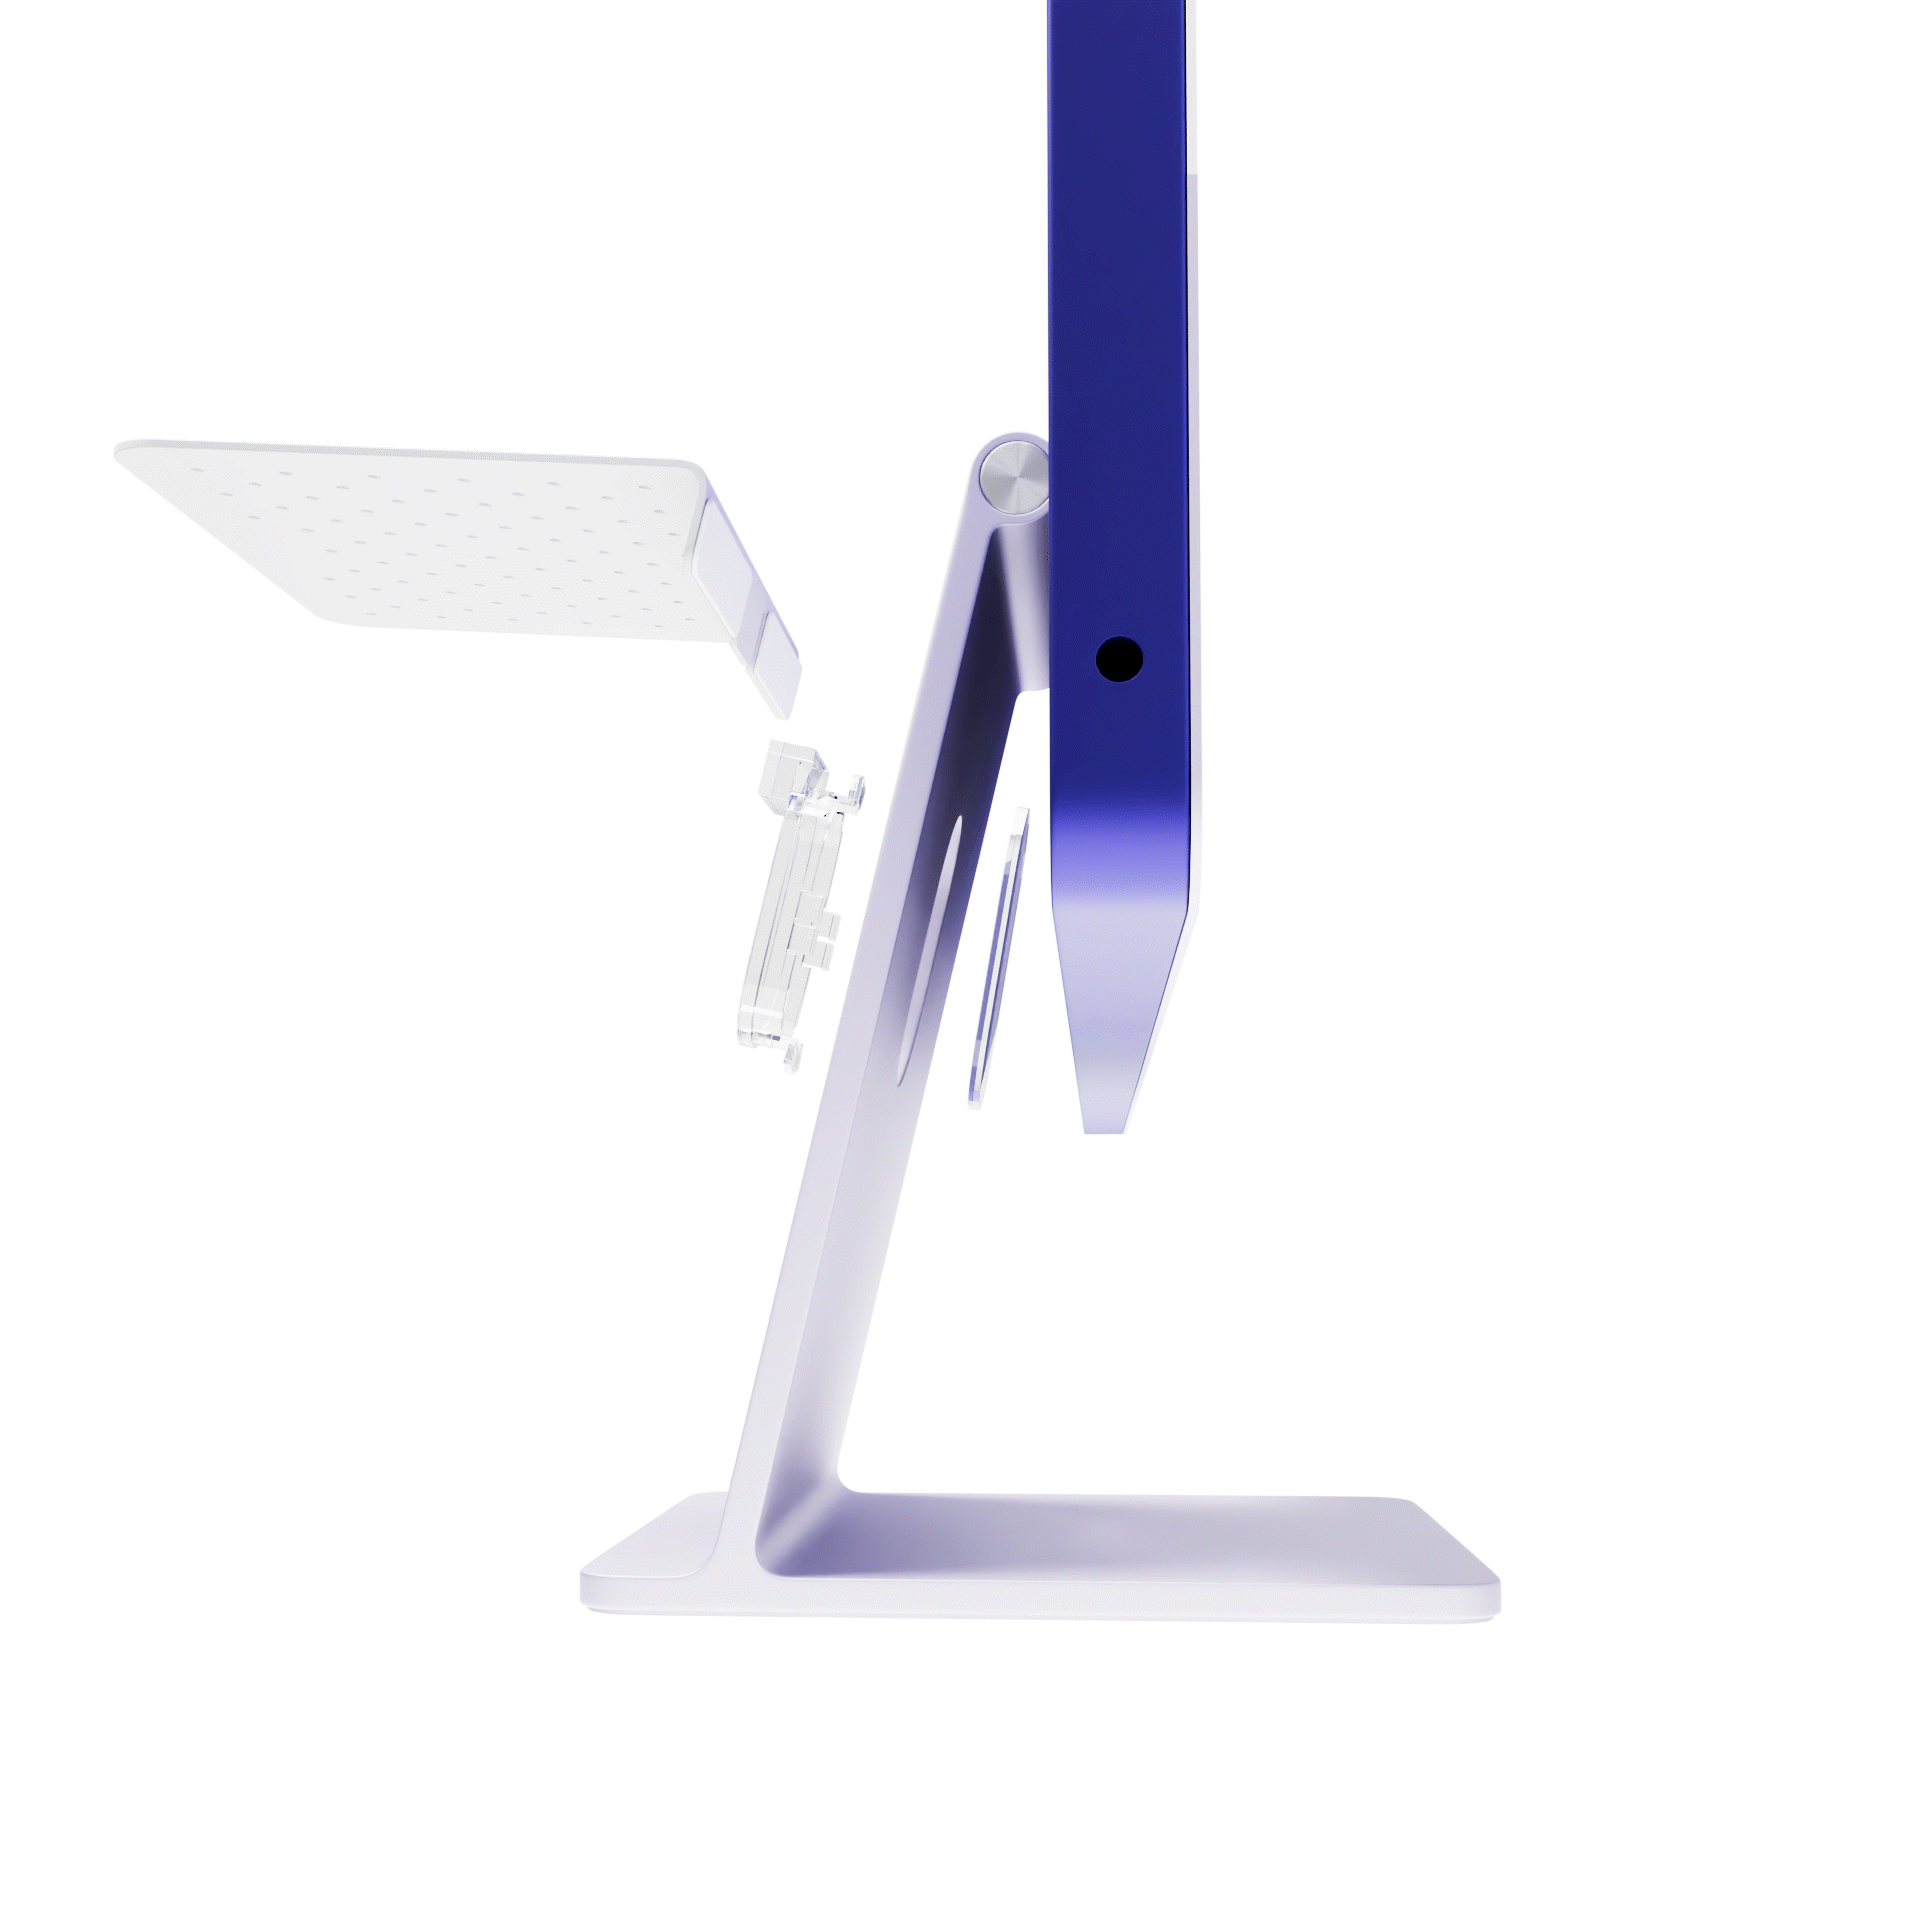
BackPack for iMac
Photos
At home on the back of your Mac.
BackPack is a sturdy steel shelf that can keep your hard drives and other USB peripherals off your desk for an uncluttered workspace.
Download High Res.
Hangs on the front or back of your Mac.
A BackPack on the front of your Mac creates a perfect place to stash your iPhone, wallet, keys, portable hard drive or anything else you would like to keep off your desk.
Download High Res.
Where's your MacBook Air?
Look how cool MacBook Air looks on a BackPack. Notice how the included vertical support pegs safely and securely hold the ultra thin MacBook.
Download High Res.
Height adjustable.
This handy shelf has two adjustable clips that allow you to position BackPack at your desired height on your Mac. You can even hang two BackPacks on one Mac.
Download High Res.
Create a Zen-like workspace.
BackPack helps you keep the space around your Mac up off your desk. Notice the two screws that allow you to adjust the height of BackPack.
Download High Res.
Holds anything up to 2.5lbs.
Sit Time Capsule, a Mac Mini or Airport Extreme on a BackPack. See the vertical support pegs? They can be positioned anywhere on the perforated shelf to hold many different devices.
Download High Res.
Built-in cable management.
Here you can see how the cable management rails keep your cables in order and at the ready. Unplug and go without your cables slipping to the floor. Cables are ready when you return.
Download High Res.
The ultimate setup.
Look below the screen on the Thunderbolt Display and you’ll see a MacBook Air SuperDrive. Imagine a BackPack on the back of this display holding a MacBook Air. That’s a killer package.
Download High Res.
Hangs with gravity.
BackPack uses gravity and two adjustable clips to stay in place. No metal comes in contact with your Mac. Here you see how one on the front holds your wireless keyboard.
Download High Res.
Hidden gem.
BackPack stays hidden behind your Mac, but whatever you park on the shelf is always within reach. Because BackPack is elevated and perforated giving your gear maximum ventilation and heat relief.
Download High Res.
Reviews
"The iMac Shelf You Probably Never Knew You Needed." ... Read More
Twelve South’s BackPack 2 Is The iMac Shelf You Probably Never Knew You Needed [Review]
Twelve South is really good at making attractive, beautifully packaged and well marketed accessories for Apple lovers.
Often, their accessories seem born from a small idea — what if your MacBook could look like a book, or what if you could attach your iPad to an arm connected to your Mac — but through excellence in execution, these small ideas quickly become indispensible.
The BackPack, first released in late 2009, is such an indispensible small idea: a little shelf to for your iMac or Apple Display. It doesn’t sound like much, but if you’ve ever struggled with a way to manage the external drives or devices connected to your desktop, that little aluminum shelf quickly became such an integral element to your Mac that it’s as if Apple had built one into every Mac.
Now here comes the BackPack 2, and it’s better than the original in every way.
The BackPack 2 is less a sequel than a refinement of the BackPack. It’s still just as good at keeping your external drives and devices out of the way when they are plugged into the USB, Firewire or Thunderbolt ports in the back of your Mac, but the addition of some new rails at the side of the shelf help you keep your cables a bit more organized and prevent devices from sliding off the shelf accidentally. And the BackPack 2’s new support pegs mean that you can now have a vertical hard drive or MacBook Air on the shelf.
The best new feature of the BackPack 2, though, is the fact that it can now be installed on the front of your Mac, facing the user and hanging below the display. There’s not a lot of room down there, but for keeping the front of your Mac organized, it’s incredibly useful. I already tended to use the bottom of the L-shaped iMac desk stand as a little shelf to keep my iPhone when it was charging, or my Apple Wireless Keyboard when I wasn’t otherwise using it. The BackPack 2’s ability to hang on to the front effectively gives you twice the space to keep things tidy.
Otherwise, this is the same BackPack we already love. It’s made from a single sheet of aluminum and attaches to your iMac or Apple Cinema Display’s L-shaped desk stand using two adjustable clips. Installation is a breeze, and once it’s lodged onto your Mac, the BackPack 2 is a lovely little accessory. Should everyone with an iMac or Apple Cinema Display buy one? Not at all. But if you do buy one, and if you’re inclined towards keeping your Mac organized and tidy, the BackPack 2 will be worth every penny.
The BackPack 2 is available for sale directly from Twelve South for just $34.99.
"An amazing solution for clearing up the technology from your desk." ... Read More
Twelve South BackPack 2 mini review
Last week, we highlighted Twelve South’s announcement of its new BackPack 2 accessory for Apple iMacs and LED Cinema/Thunderbolt display. The accessory is the successor to its original BackPack, a device that allows you to store hard drives or other peripherals behind your large display. The new version expands on the original, adding the ability to securely store things like laptops, the ability to store items below the display, and adding improved cable management by way of built-in rails.
I’ve been testing out the BackPack 2 in our workflow for the past week, and it is a great accessory. I have never tested out the original version, though the basis of the BackPack is neat. As an LED Display user with a MacBook Air, it is so convenient to store the MacBook Air behind the display when I am at my desk. That way, my desk can be used to store other things. The MacBook Air can be safely placed on the BackPack with an included set of pegs.
With that in mind, the BackPack 2 is an amazing solution for clearing up the technology from your desk. Perhaps an extension of that sentiment are the new cable rails on the right and left sides of the unit. These rails are perfect for pulling your cables through for increased organization.
On that note, the BackPack 2 is also perfect for storing external hard drives behind your display. New in the 2.0 version is the ability to place items below your display. On the note of clearing up your desk, you can use the BackPack 2 to store your wireless trackpad, keyboard and/or mouse in an easy position for taking and placing when needed.
Overall, we’ve enjoyed using the BackPack 2 and we recommend it for those who need an easy and cost effective ($34.99) solution for clearing up their desk and storing their technology.
"A brilliant shelf for your Mac that stores laptops and hard drives" ... Read More
The newly refined BackPack 2 is a brilliant shelf for your Mac that stores laptops and hard drives
The original BackPack was like many Twelve South products in that it was an incredibly obvious product produced with a high level of polish. Adding a shelf to the back of your Mac to store hard drives and other knick-knacks may have seemed like a no-brainer, but the BackPack was the accessory that nailed it. The BackPack 2 keeps the core behavior of the first model and adds a few small tricks of its own to entice you if you haven’t already made the jump. In addition to mounting on the back of your Mac, it will also mount to the front of the support pole on Apple Displays, creating a forward-looking shelf that you can use to store things off of your desk. Since I don’t have a separate Apple display, it wasn’t practical for me to test that out, as a 27″ iMac has very little clearance underneath and a shelf wouldn’t be convenient.
I was, however, able to test the other two new features: the ability to store items vertically and some new cable management rails along the sides.
The BackPack 2 comes in Twelve South’s trademark posh packaging, which is always done so well. When you remove it from the textured box, you’ll see two clips, two sets of inserts, four vertical support posts and the shelf itself. An instruction manual and a parts diagram are inside as well, so you know exactly which inserts are made for which displays.
The clips are designed to slide along the rear rail of the BackPack, letting you place the shelf anywhere you like. They’re set so that they only go one way, acting as a wedge that tightens when weight is applied. The inserts also apply torsion to the support beam as you set items on it, so I experienced very little slippage issues when attaching the shelf. I do wish that the screws had a place to use a driver on them, as I would like to clamp them down a bit tighter than my fingers can do.
The posts are inserted through any of the perforated holes on the shelf, which also act as ventilation. If you’re using drives that are metal-to-metal, there’s a handy rubber mat included, but ditch it if they’re in enclosures, as you’ll get better heat passthrough that way. Once you’ve shoved the poles through, you can tighten them down with the thumbscrews. Once again, the thumbscrews could have used the ability to…well, screw them. But they go on ok after a bit of tightening.
The shelf is easily big enough to store two vertical drives, which stay on just fine even without the support posts. The rubber mat actually does help with slipping here, especially if you tend to move your desk a lot when you type. If you’re concerned about them tipping off, you could use two posts as a retaining wall along the outer edge.
When using four poles, two front and two back, my MacBook Air stood up just fine on the shelf. The maximum weight is 3.5lbs, so larger laptops like the 17″ MBP or the like are out of luck, but 13″ MacBooks or Airs are no problemo.
In the view above you can see how the shelf is attached, with the screws and the cantilever holding the clamps tight against the support beam of the iMac. As I said, no slippage issues, even when moving the desk around while shooting images and testing.
The new rails along the sides allow you to slip cables through them to keep them in order, which is handy if you’re using the shelf to store drives. They work just fine, and routing them through the rail and then through the hole in the support beam works quite well for keeping short 3ft cables in order.
One issue I had with the BackPack 2 in my setup was that I keep my iMac very close to the wall, with the beam almost touching it. Because of the rear clearance, I had to move my iMac away from the wall onto my desk. This screwed with my head because I like to have a certain amount of distance away from my screen when I’m using my big iMac. So I had to scoot my desk out from the wall about an inch and then move my iMac away from me to keep the same distance. Obviously a lot of that has to do with my particular brand of neuroses, but I thought I’d tell you. Don’t judge me.
The BackPack 2 is a fitting sequel to the original design, with well machined aluminum that matches up closely with the finish of the iMacs, Apple Displays and MacBooks that it’s designed to be used with. All of the parts are carefully done, with rubber coatings on the support posts and ridged grips on the screws. Aside from not having any way to tighten the screws with a tool, I couldn’t find a lot to dislike about it.
If you have no external drives or any other crap you’d like off your desk, hey, I understand, but I don’t think I like you very much. Just kidding. But, if you have an original BackPack, the cord management and vertical storage might be a good reason to drop $35 bucks, and if you don’t have one, there’s really no reason not to snag one at that price.
BackPack Top View
Pellentesque habitant morbi por senectus et netus et malesuada it fames ac turpis egestas.
Download